Author Topic: Toyota Highlander crash rebuild  (Read 7781 times)

Offline goodfellow

  • Global Moderator
  • Hero Member
  • *****
  • Posts: 4340
Toyota Highlander crash rebuild
« on: August 14, 2018, 07:44:08 PM »
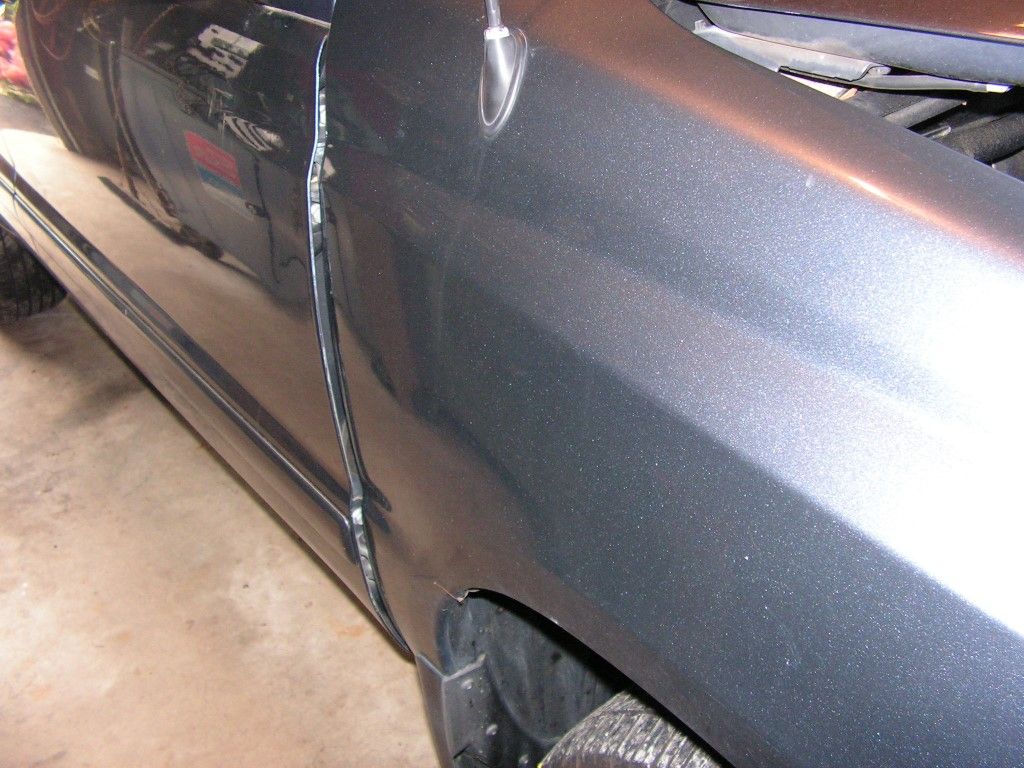
This was a rebuild I did after my daughter got caught up in a pile-up on I-95S

The car was in sad shape when it arrived on the rollback. It's 12 years old and we stopped carrying collision on that car after it turned 10 years and only carry liability. I was tempted to scrap it out, but I really like this model year and decided to tow the damn thing back home and start the rebuild process. What the heck -- I have tools, welding equipment, and and some time over the next month, so I will rebuild it.

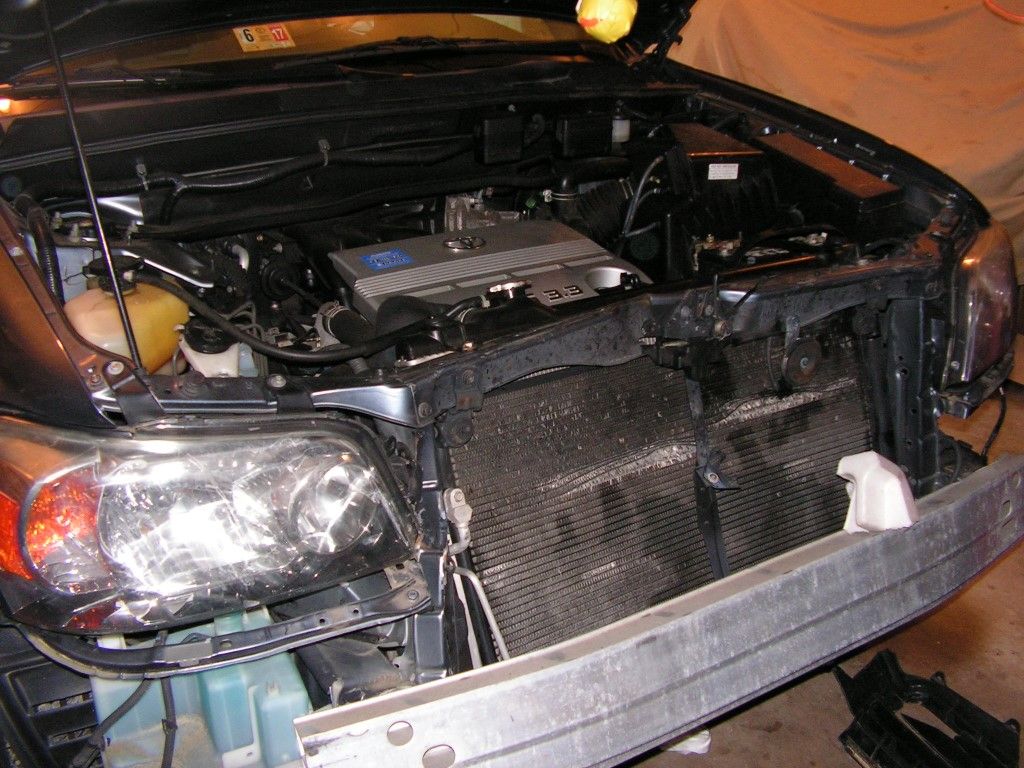
This is how it arrived off the flatbed this morning -- the entire front sheetmetal and fenders were off.


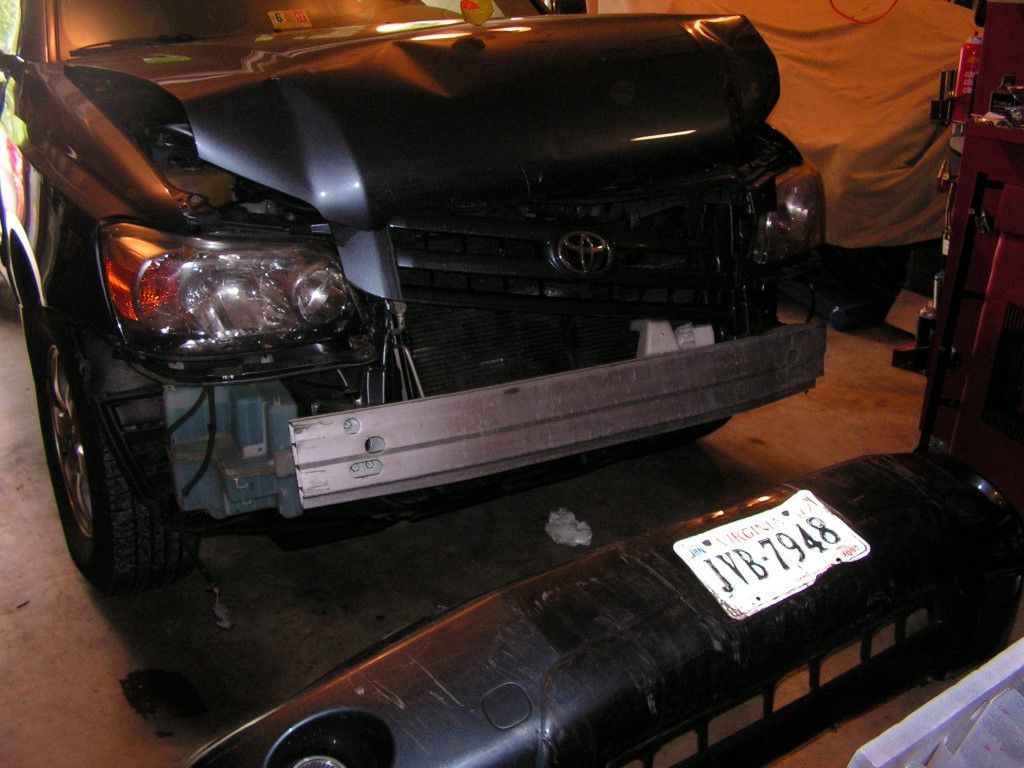
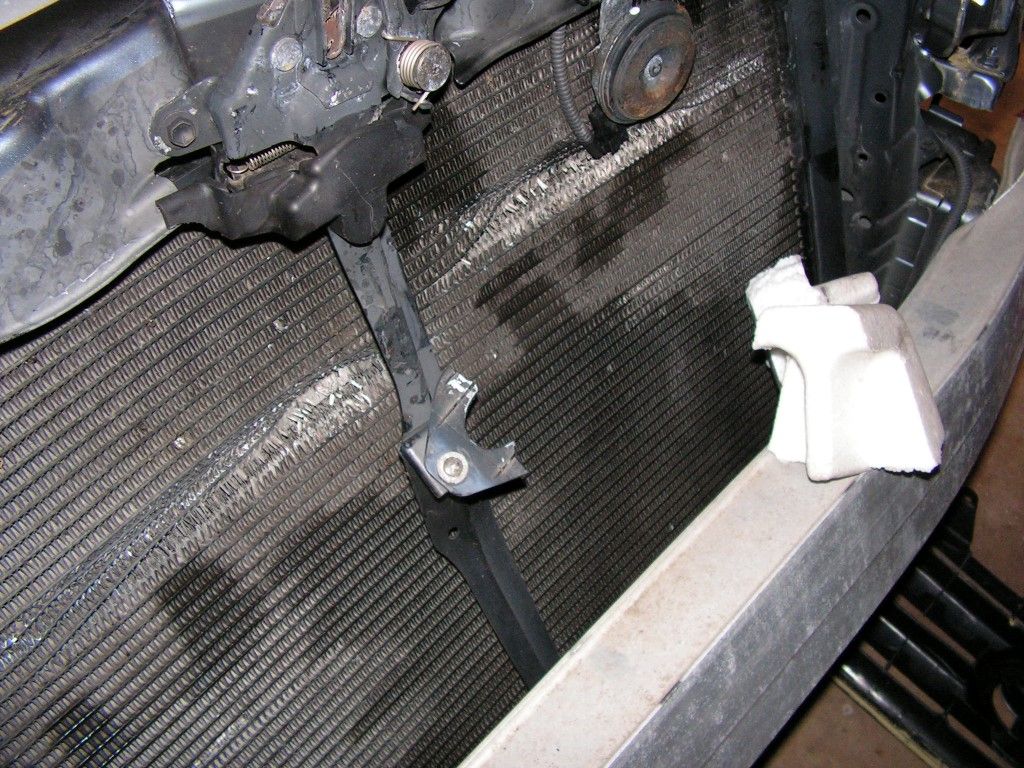
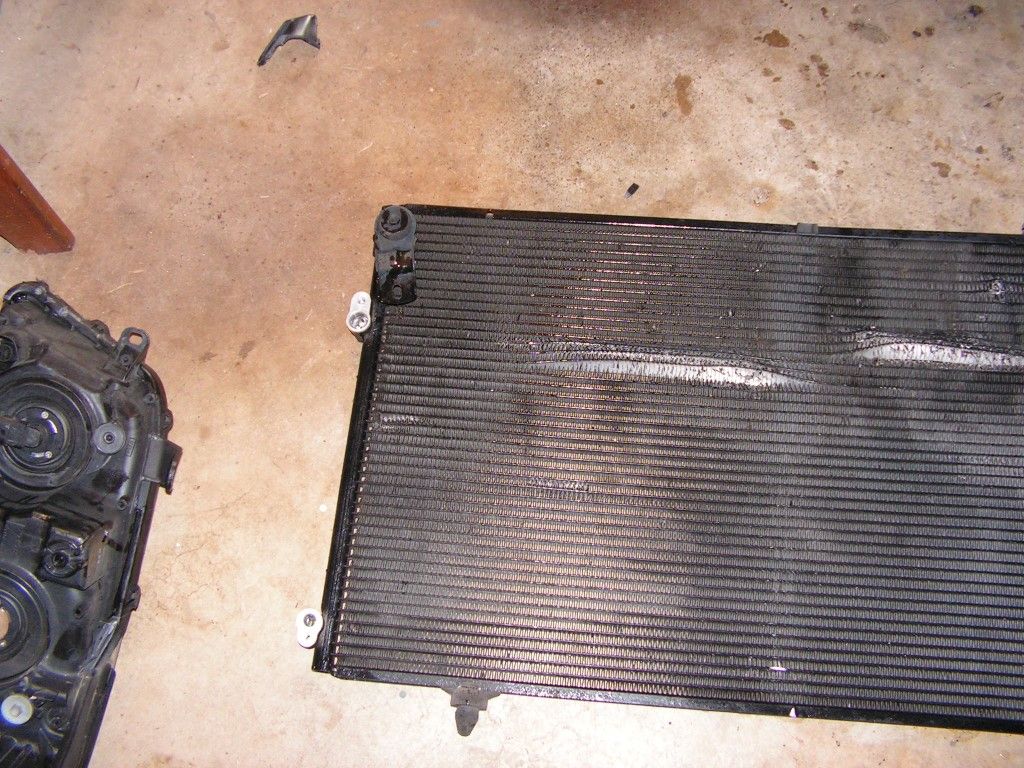
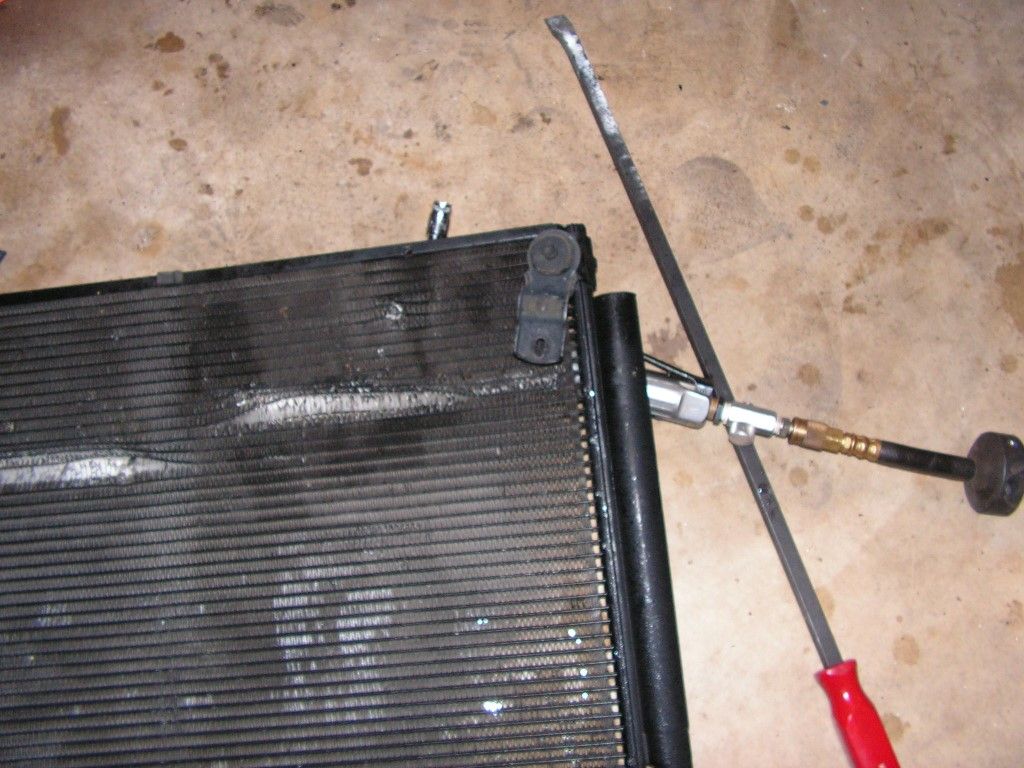
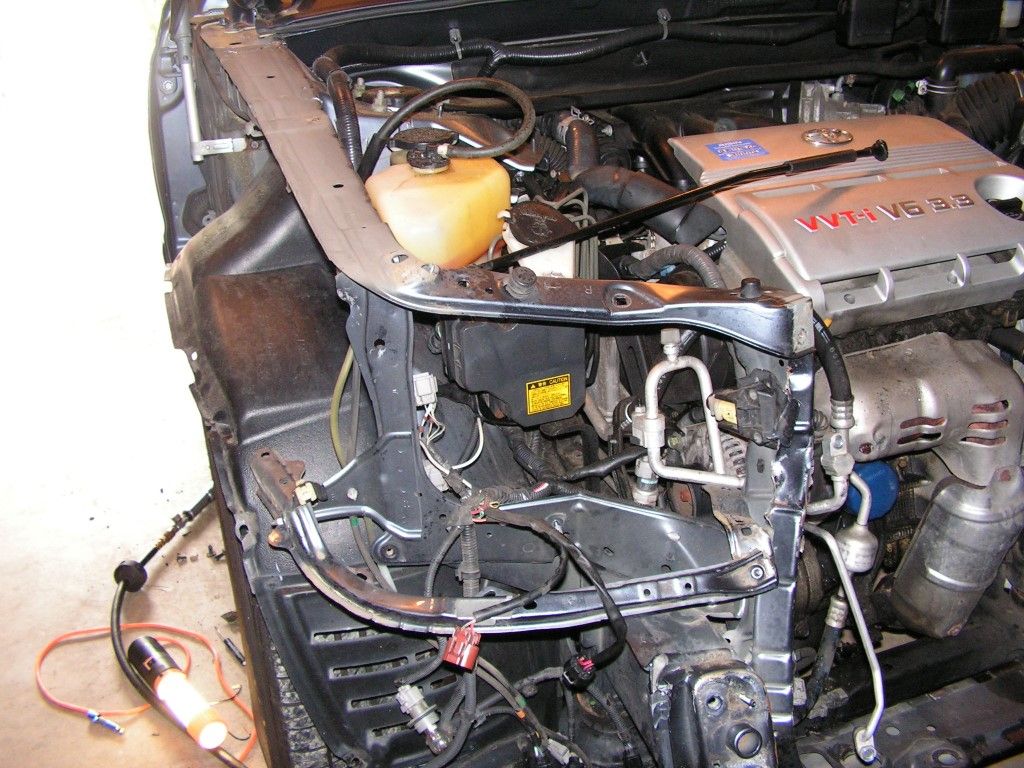
I started to strip it -- and pretty much the entire core support and ancillary pieces (radiator, condenser, lights, bumper supports), were trash.


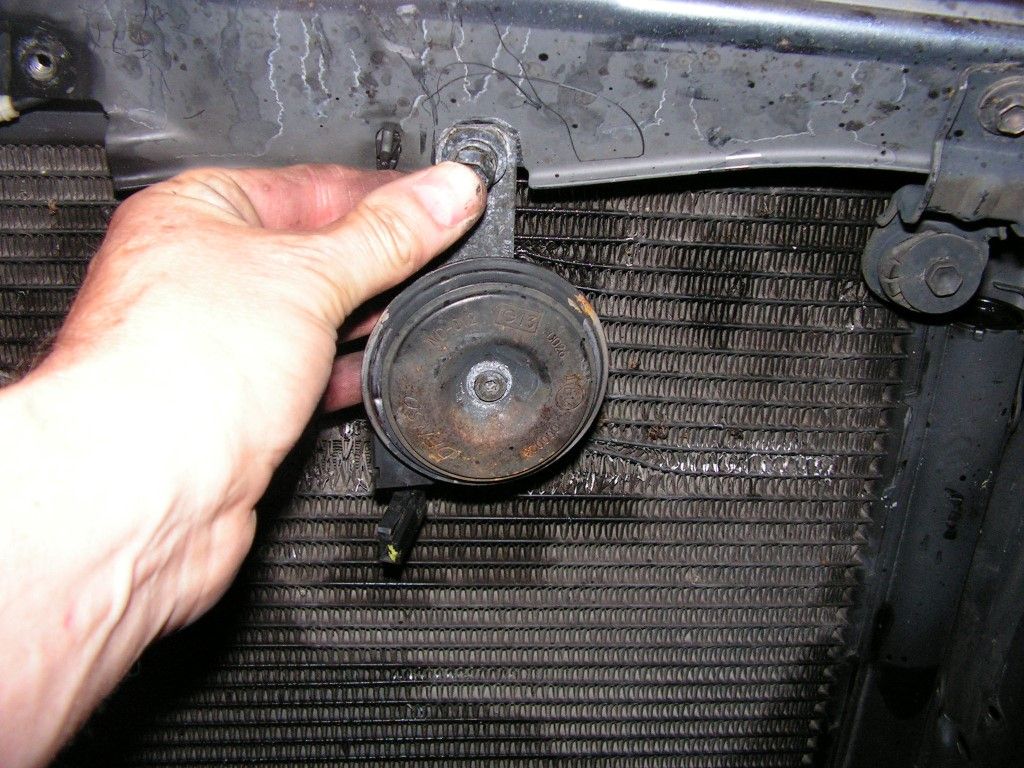
Only thing that was intact was the "iddy-biddy" horn --  :))


Stripping a tangled mess  -- what joy!!


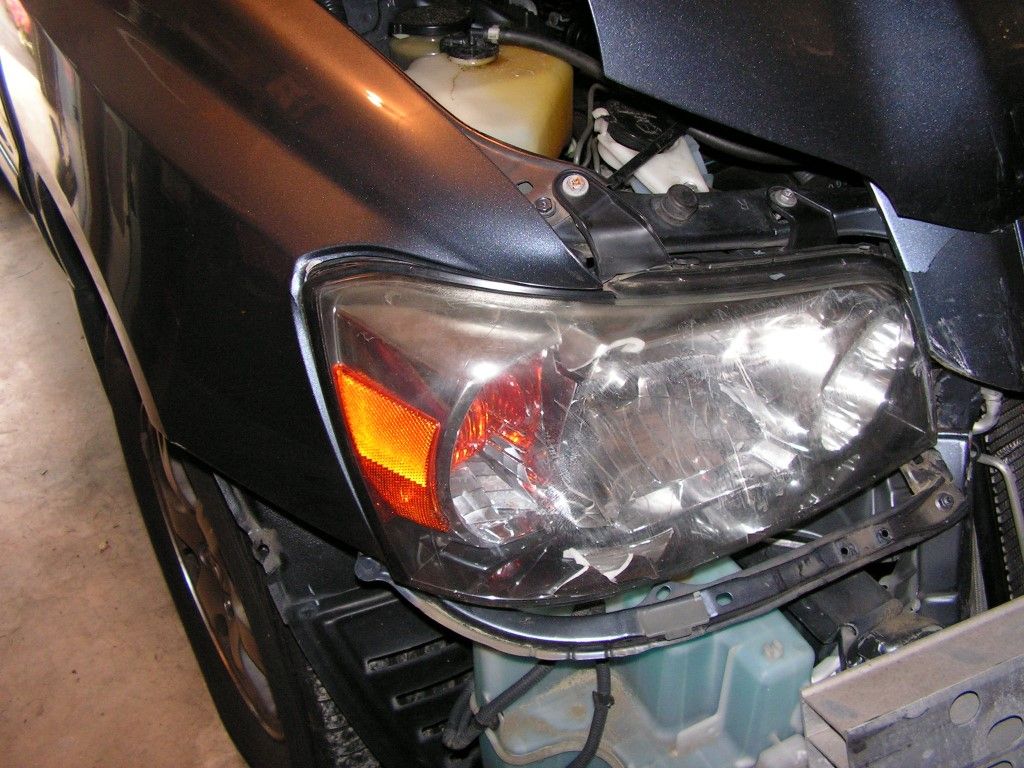
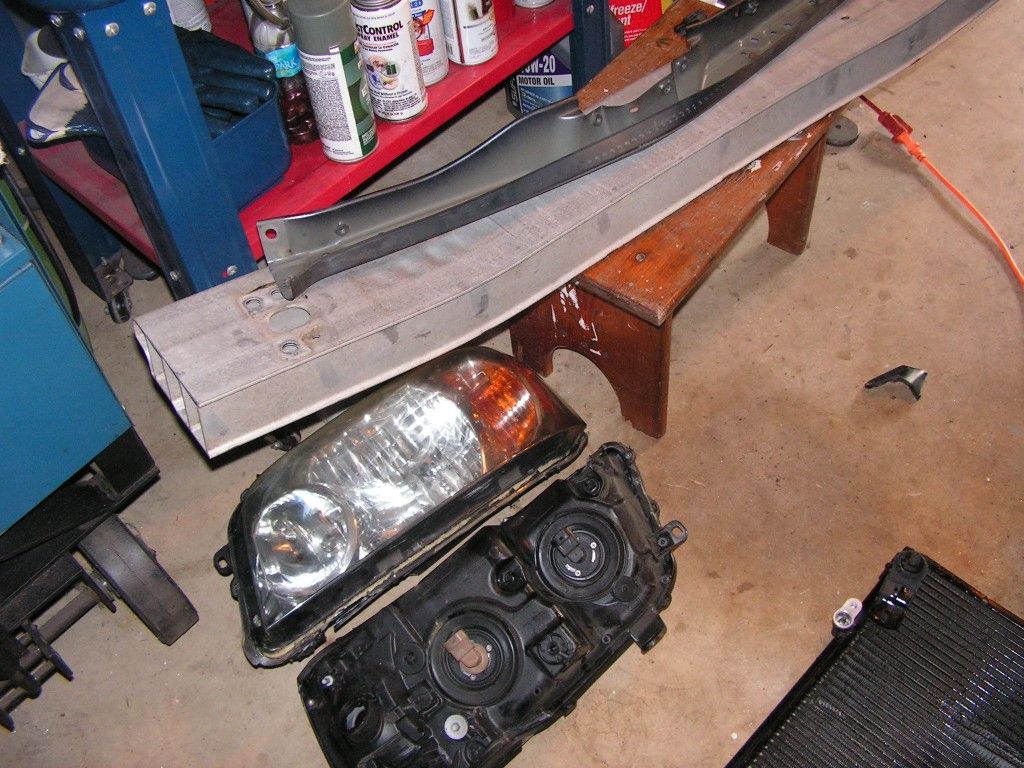
Headlights are toast --


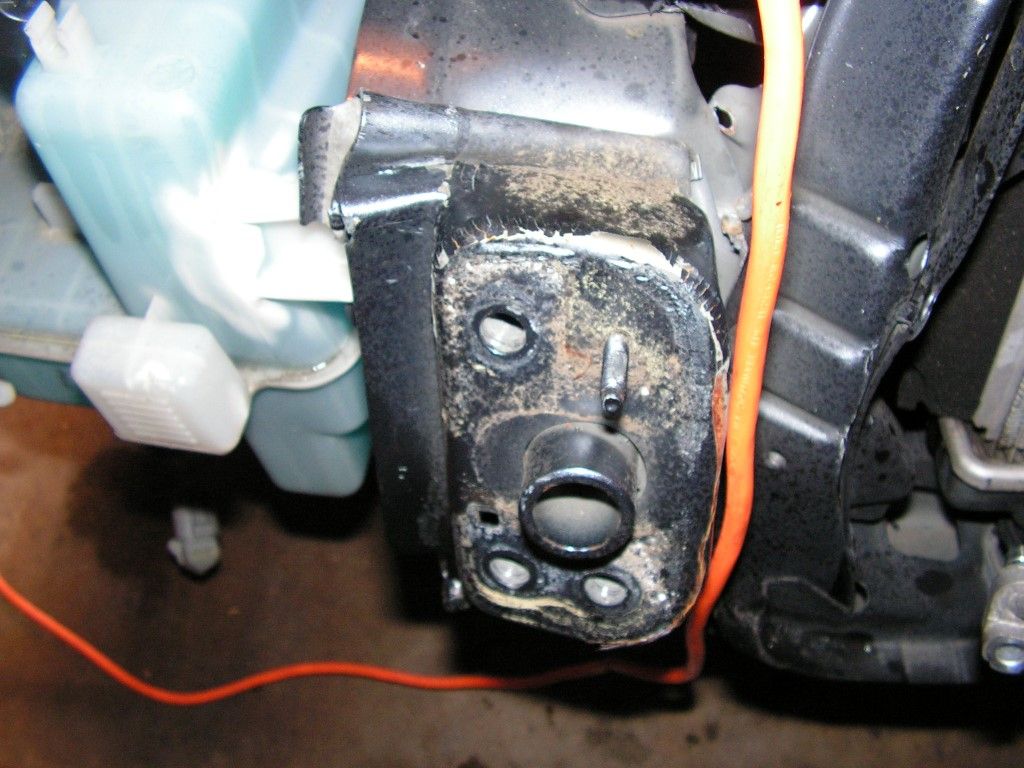
The biggest issue is the reinforced frame bumper mount -- it's totally crushed. I'll have to cut this out and replace it with a new fabricated frame mount.


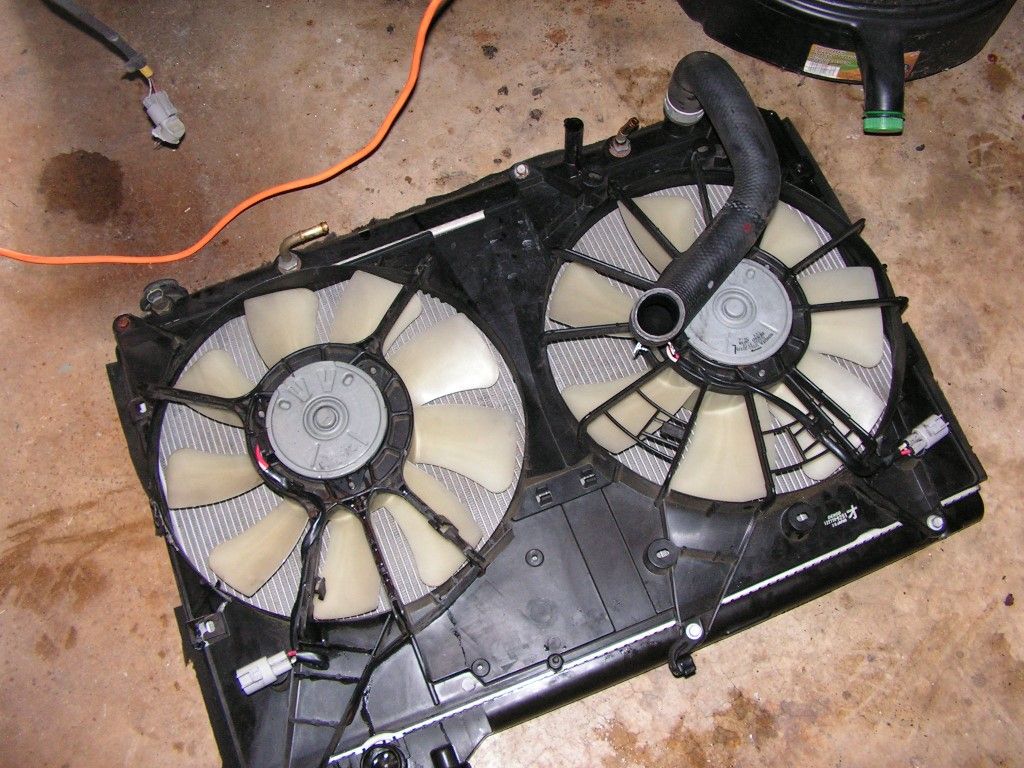
Radiator is toast, but surprisingly the fans are in good shape and can be reused.


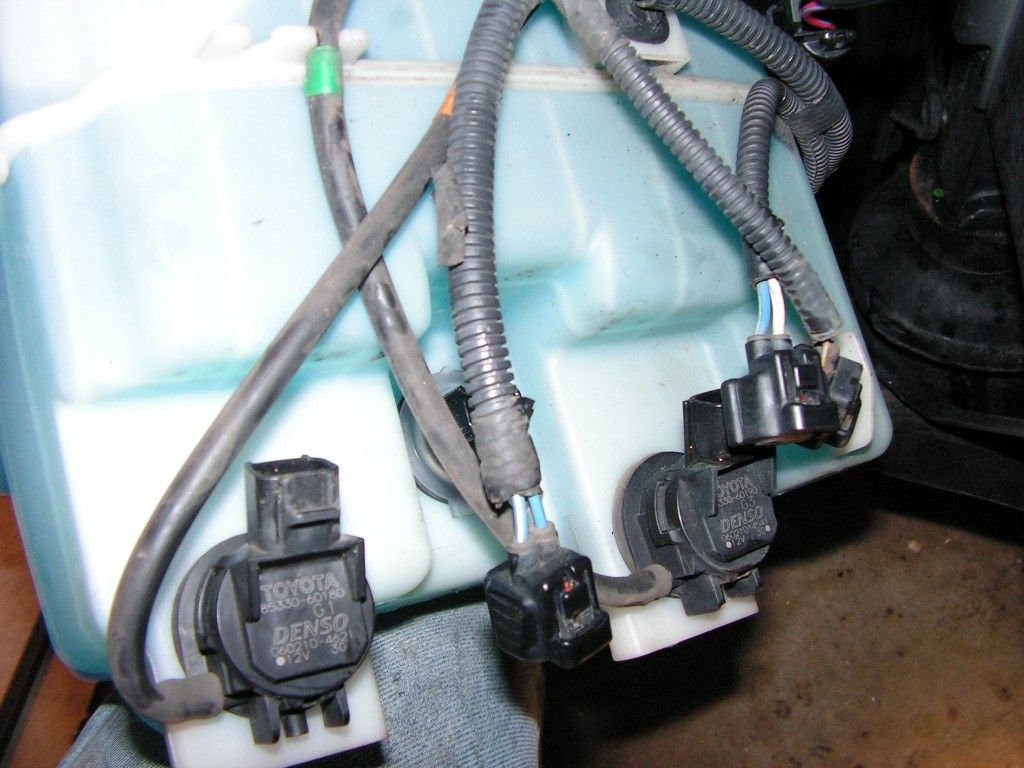
Even the plastic washer bottle was spared. Which is also a surprise since it sits way in front, and right behind the bumper mount.


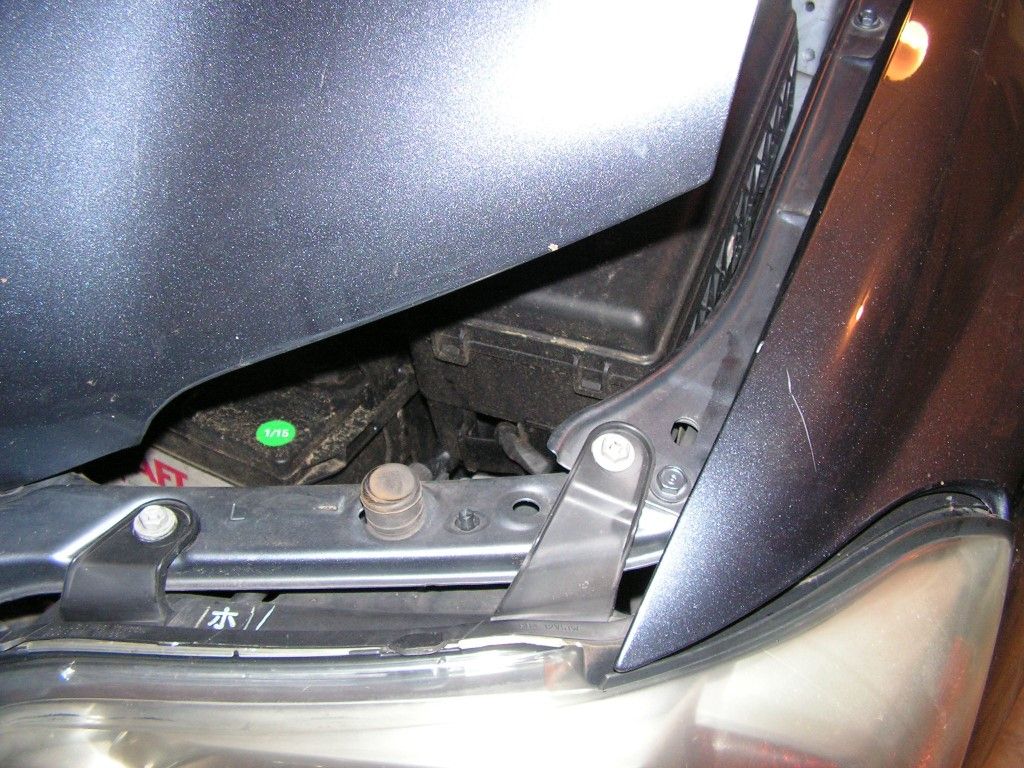
The core support need to have the spotwelds cut and be totally removed. My job for tomorrow is to cut all those spotwelds and remove the crushed support


Finally, at the end of the afternoon I got around to placing an order for about $1000 in new parts. I plan of replacing the parts and giving this old Highlander a new lease on life. Including this little fiasco, over the past seven years I've pretty much touched every body panel on this car with some sort of bodywork.


« Last Edit: September 05, 2018, 03:07:33 PM by goodfellow »

Offline goodfellow

  • Global Moderator
  • Hero Member
  • *****
  • Posts: 4340
Re: Toyota Highlander crash rebuild
« Reply #1 on: August 14, 2018, 07:44:55 PM »
Second day was a hard day - spent most of it cutting spotwelds to get the crashed core support out, and to straighten some associated mounting points. The good news is that the headlight mounts are in great shape -- a little tweak here and there and they were straight.


The big job was removing all the tangled core support pieces. There were spot welds everywhere --


I also had to keep track of the wiring loom and associated control module mounts -- there are a lot of them.


I started with the top left mounts and worked my way down and across to the other side -- centerpunching, spot drilling, and then finally weld drilling.


Tedious, but I got good results --


The bottom support was fairly easy because it was flat and easy to access -


Lots of dropped fasteners and hardware in that cavity -- when I finally open it up, there must have been a dozen screws and bolts trapped in there. I know they didn't come from me, so I assume that was done at the factory.


Finally I made my way back up the right side and called it a day


Completely removed core support and after I straightened a few flanges, I feel pretty good about it.


Tomorrow will be the critical day though because I will have to cut off the passenger side bumper mount in order to straighten it. That thing is crushed like and accordion. Time for some plasma cutting work --


Onward --


Offline goodfellow

  • Global Moderator
  • Hero Member
  • *****
  • Posts: 4340
Re: Toyota Highlander crash rebuild
« Reply #2 on: August 14, 2018, 07:45:38 PM »
I was able to get a clean cut on that bumper support and rescue the bumper mount. I had to cut the support base that the core mounts on in order to separate the mangled bumper mount.


Then I made a cut on a good straight section of the boxed frame to get the crushed pieces free.


Here is the mount and the mangled mess. This mount took a good hit, but I was able to free the important mounting section and will use the new aluminum bumper reinforcing bar to align this mount with a new fabricated frame section.


This is what I was after -


The other pieces were not salvageable


 Tomorrow I will build a new outer and inner mount support structure. The OEM is high-strength steel, but if I can fabricate a double wall 16ga cold rolled sleeved mount with inner reinforcements, then I think I will be in the ballpark as far a OEM rigidity and strength are concerned.


Parts started showing up this afternoon -- aluminum bumper reinforcement bar and the new headlight assemblies.


What I really need is the core support to start measuring the frame standoff on the mounts. Hopefully it will show up early in the week.

Onward!

Offline goodfellow

  • Global Moderator
  • Hero Member
  • *****
  • Posts: 4340
Re: Toyota Highlander crash rebuild
« Reply #3 on: August 14, 2018, 07:46:19 PM »
I did manage to get the inner frame section built out of 18ga steel. The inner section is boxed and braced with a triangulated section of 16ga intended to resist a crush on impact. It will be covered and welded to an outer 16ga shell that will act as the primary bumper support.


Trial fit looked good -


Top section welded in and ready for some clean-up


It's a good fit on the old mount


Things are coming together --


Tomorrow I'll need to fabricate the outer frame support shell out of 16ga, and make this thing a nicely welded support structure again.
Hopefully the core support will show up this week and I can start the reassembly and welding process.


Offline goodfellow

  • Global Moderator
  • Hero Member
  • *****
  • Posts: 4340
Re: Toyota Highlander crash rebuild
« Reply #4 on: August 14, 2018, 07:46:51 PM »
Finished the outer frame section today. I can't say enough about these little forming bucks that some gent in England invented, and even though i have three sheet metal brakes, making complex bends sometimes limits the use of the brakes. I built this thing a few years ago very "quick and dirty" and it truly is one of my favorite forming tools.


This raised lip for example needed to mimic the original in the Toyota front bumper mount. It looks simple, but without special tooling it's difficult. With my little forming buck i was able to knock one out in less than 30 minutes.


I lightly tacked it up just to check the close fit and to take some measurement. Looks like this will work fine --


Tomorrow I'll weld in the inner support that i fabricated and then hopefully this outer frame section can get tacked in place for final bumper support fitment.


If this all lines up, then the core support should be easily aligned and fit into final position.

Onward

Offline goodfellow

  • Global Moderator
  • Hero Member
  • *****
  • Posts: 4340
Re: Toyota Highlander crash rebuild
« Reply #5 on: August 14, 2018, 07:47:18 PM »
Everything tacked nicely in place and holding firm in order to get the final measurements double checked. The bumper is sitting level and has the correct offset from the body. All I need now is the darn radiator core support. It's been sitting in a UPS truck since late last Friday - and the UPS tracking site says that it will get delivered today. -- Fingers crossed.


Without that core support I can't weld everything up solid because the support must fit exactly between the two bumper mounts -- so I still may have to tweak my fabbed mount a bit.


Most importantly, everything is square and true again -


I've been working this job a couple of hours each night -- hopefully next week when I'm on vacation I can get a good solid week in on this thing.

Offline goodfellow

  • Global Moderator
  • Hero Member
  • *****
  • Posts: 4340
Re: Toyota Highlander crash rebuild
« Reply #6 on: August 14, 2018, 07:48:08 PM »
I finally made some good progress -- the core support showed up and I trimmed and drilled it for the plug weld holes.


I clamped everything in place and double/triple checked the measurements using the strut towers as my baseline.

The core support needed a small tweak on the driver's side to make it fit.


Next I fitted the fenders to get the top of the core to the proper offset so that the hood and latch can line up properly


I cut the last of the old support base when all the measurements were the same from the left and right sides.


The newly fabbed frame support was permanently welded in place, and the right fender was attached.


Notice the door gap? It was a bit too wide, so it needed a few tweaks to make the gaps even. I eventually got it right.


I finally fit the headlight assembly supports and they were spot on -- on both sides.


Everything looked good, so I lightly tacked the entire support in place to keep it from moving around.


Finally I fit the bumper support and tacked the support bracket to my fabbed frame section.


The core support is lightly tacked in place because tomorrow I want to fit the hood. The hood will be the  "proof of the pudding" so to speak. If the hood installs with good gaps and the latch has a good purchase on the hood, then I know for certain that all my measurement are alright and then I can weld everything up permanently.

Onward!


Offline goodfellow

  • Global Moderator
  • Hero Member
  • *****
  • Posts: 4340
Re: Toyota Highlander crash rebuild
« Reply #7 on: August 14, 2018, 07:48:31 PM »
The hood arrived, but I it was a bit of a disappointment. The rear edges were bent due to transport, the center had a ding in it, and the right edge was bent  -- also due to transport problems.


I'm not going to send it back. I have to paint it anyway, so I'm going to fix it and just roll with it. Truth be told, I've never received a body panel that didn't have some sort of ding or scrape.

I did a trial fit before welding the core support, and it seemed to line up pretty well. I had to widen the fender bolt holes a bit to get them to slide inward a little more and close the gap. But after a few tweaks I was able to align everything to a point where the core support could be permanently fixed in place.


Getting the bumper support straight and tight was a big job, but in the end it was a great fit.


Finally, the hood and fenders were attached and the gaps were checked -- a little bit off on the right front, but the left was right on.


Adjusting the fender a tad  inward solved the gap issue.

This is how far I got -- unfortunately I didn't get all the driver's side core support plugwelds done because I ran out of .023 Mig wire. I NEVER run out of that gauge wire, but sure-nuff I didn't have another spool. I had a spool of .030, but it doesn't run too well on my machine for making plugwelds and welding light gauge steel. I order two new 10lb spools, but to finish this off tomorrow I had to order a 2lb spool from my local Home Depot -- and I paid through the nose for it. 

$12 for a 2lb spool at HD, vs $36.55 for TWO 11lb spools from my online supplier.

Anyway -- I'll be done welding core tomorrow. Most of it is already burned in solid, just a few moire plugwelds to go.


Onward!


Offline goodfellow

  • Global Moderator
  • Hero Member
  • *****
  • Posts: 4340
Re: Toyota Highlander crash rebuild
« Reply #8 on: August 14, 2018, 07:49:01 PM »
Finished the last few plugwelds today and then dressed the welds a bit to make them flush. I'm not too concerned about cosmetics with this thing, but a little neatness never hurts. I then took a red scuffing pad and and scuffed the entire radiator core surface to get it ready for paint.


I had some paint left over from a previous repair and put the first coat down.


Three coats did the trick


The paint did a good job brightening this front end back up


Now to get the fenders hung permanently and get ready to install the new parts.


Onward

Offline goodfellow

  • Global Moderator
  • Hero Member
  • *****
  • Posts: 4340
Re: Toyota Highlander crash rebuild
« Reply #9 on: August 14, 2018, 07:49:20 PM »
Well, today I was able to actually install some new parts -- new radiator, new condenser, new lights, and new bumper reinforcement beam. I reused the old washer bottle and associated clips and fasteners.


I reused the old fenders since there was minimal damage -- they will be easy to paint. The lights needed to be installed to the fender cutouts to match the seams for proper sealing and fit


The condenser and center support were installed with minimal effort. I was worried about this part because if the radiator core support would have been installed off-center or crooked, then these parts would not fit very easily (or not at all).


The light assemblies fit very well -- good to go.


Door gaps are pretty even as well


Done for today -- everything seems to fit well. The wiring harness and the connectors were double checked, and finally the battery and hold-down bracket was reinstalled. Tomorrow, I'll fill it with fluids, evacuate the AC system to see if it will hold vacuum, and then hopefully start her up to see if the fans and cooling system work.


If all checks out, I maybe able to get to the bodywork stage at the end of the week.

Onward!

Offline goodfellow

  • Global Moderator
  • Hero Member
  • *****
  • Posts: 4340
Re: Toyota Highlander crash rebuild
« Reply #10 on: August 14, 2018, 07:49:55 PM »
I started this morning with leading the collapsed edges of the hood. They were damaged during shipping and needed to be reinforced at the corner with something much stronger than fiberglass or plastic filler. I did use some plastic filler to fill in several small shipping dents, and then prepped the entire top surface for primer/filler.


By late afternoon I was ready to spray three coats of primer/filler and a guide coat for finish sanding. I let the primer cure in the hot sun all afternoon and it's pretty well hard.


The hardest part of this day was tracking down an electrical problem. I put a vacuum on the AC system for over an hour to get any possible moisture out and then let is sit for two hours under vacuum to see if there were any leaks. Luckily the system was tight. I then tried to charge the system with the recommend 24oz of 134a refrigerant, but that's where the problems started. When the AC system is energized, one of the two radiator fans should kick on and stay on for as long as the AC system is running. Unfortunately the fan never came on; making it impossible to charge the system in a proper manner. I had checked the fans before installation and they were good to go; so something was not right with the electrical system.

I jumped the pressure switch plug and the fan did't respond, hence it's either a broken or shorted wire due to the crash, or a relay, or fuse -- or both.


I checked continuity on all the fan wires and on my final test checked the relays and fuses. Sure enough I found a diagram on line that identified the 30A fuse marked CDS as the primary circuit to the AC fan. While a corresponding 30A RDI fuse was in the primary circuit to the radiator fan. The CDS fuse had probably blown when the fan blades were pinched against the collapsed radiator; which made the current draw spike. That little bit of diagnostic work took way over an hour.


Hopefully I can get the front bumper cover prepped for paint tomorrow, and paint these panels over the weekend.


Offline goodfellow

  • Global Moderator
  • Hero Member
  • *****
  • Posts: 4340
Re: Toyota Highlander crash rebuild
« Reply #11 on: August 14, 2018, 07:50:16 PM »
The last three days have been wet and rainy, so no work on the paint. Yesterday the skies cleared and I was able to pull the old hardware from the damaged panels. A lot of hardware was lost so I opted for a complete Toyota hardware kit on ebay -- it comes with the most common body fasteners.


I pulled the old foglights and after installing new bulbs I will reuse them in the new bumper cover


The bumper cover was scuffed with a gray scuffing pad, while hood was scuffed on the bottom side and sanded with 220 and 320 grit on the top -- everything nice and smooth.


I partially sprayed the underside of the hood because most of the surface will be covered by heat/sound shield pad.


The leaded corners came out nice --


This morning I setup a small paintbooth using 7-mil plastic and used my fresh air system to spray three coats of color and two coats of clear on the hood, the bumper cover and the inner grill.


Everything came out OK -- a few dust spots, but tomorrow I'll color sand and buff the panels, and they should look very good.


Hopefully I can try to assemble everything tomorrow afternoon or Tuesday

Onward


Offline goodfellow

  • Global Moderator
  • Hero Member
  • *****
  • Posts: 4340
Re: Toyota Highlander crash rebuild
« Reply #12 on: August 14, 2018, 07:50:44 PM »
The console is pretty straight forward to remove

Remove the shift console binnacle -- it simply pries up and is only secured by four snap-in clips

The console itself has two bolts in the rear bottom compartment, one side bolt (each side) by the seat rails, and three Phillips screws once you remove the console binnacle 


The airbag module is located directly underneath the shift lever assembly and is held in place by three 12mm bolts. -- one in front and two in the rear.


The best way to get at it is to clear as much carpet as possible to make room for extracting the entire module


This is what the module looks like -- the single rear bolt is easy to remove, but the two bolts on the side are tough. Best way to tackle that problem is to disconnect the rear air ducts from the blower unit. There are two air ducts -- one duct on each side of the module -- effectively blocking access to the module side bolts. I simply pushed down hard on the ducts where they connect to the blower and they sprang loose and I was able to push them out of my way to make room for a 12mm swivel socket on a 12" extension. That solved the access problem.


Here is a two pics of the empty space where the module resides


The other issue was the driver's side seatbelt.

I removed the plastic front and rear door sill covers -- the simply push/slide forward (toward the front of the car) and then you pull up to release the sill covers  (I had to pull the door seals out of the way a bit, but that is a trivial matter.


The inner "B" pillar plastic cover can now be removed by simply pulling on it -- it releases 5 clips in the pillar. Then the top seatbelt mounting clip on the "B" pillar is simply split open (like a clamshell) to reveal the mounting bolt -- it's fairly tight and I had to use a long handle 3/8" drive ratchet to get it off. Then the lower "B" pillar mounting bolt is removed.


The seatbelt module sits in the bottom of the "B" pillar and is held in by two bolts. The electrical connection is a lock type. Pull/pry up the lock tab with a small screwdriver and the connector comes loose.


Offline goodfellow

  • Global Moderator
  • Hero Member
  • *****
  • Posts: 4340
Re: Toyota Highlander crash rebuild
« Reply #13 on: August 14, 2018, 07:51:43 PM »
Well, the body and paint work on this thing is essentially done. I hung all the panels, and with very few exceptions the panels went on as expected -- I guess my measurements and fabrications were within the spec for fitting up parts.

The only real problem I found was with the aftermarket hood. I couldn't check the original hood's front crown lines and compare them with the aftermarket hood because the original piece was so crushed and crumpled that a comparison would have been impossible. Turns out that the new hood crown lines are stamped inward a bit too far to match up nicely with the grill on the corners. It is what it is, and I should have remembered to check it, but I forgot and just went with it -- my bad!


Overall the car looks tight and the color looks OEM. I painted the hood, the bumper cover, and the grill, and there are a few dust particles in the clear coat, but after this paint job has a chance to harden for a few weeks in the summer heat, I will sand it with 2000 grit and give it a nice buff and polish. It should look factory.

I was going top paint the entire car, but my daughter needs the car in two weeks for summer work; hence she only gets the Earl Scheib treatment. We'll see about painting the entire car in the fall.


All that's left is to install the plastic inner fender liners, the new seatbelt module, and the reflashed airbag control unit. I also have to charge the AC. Hopefully all will be done before Memorial day.

Offline goodfellow

  • Global Moderator
  • Hero Member
  • *****
  • Posts: 4340
Re: Toyota Highlander crash rebuild
« Reply #14 on: August 14, 2018, 07:52:29 PM »
Today I received my airbag module and seatbelt back from the rebuilder. It was a quick turnaround, and they provided very good service -- I highly recommend myairbags.com in Duluth GA


First thing after work was to get the airbag control module back in the floor plate, and the center console hooked back up.


Once you've removed that darn console, it's pretty easy to get it back into place. The hardest part was aligning the bottom console bolts


The electrical connections are all one-way fitted plugs and you can't make a mistake -- they only fit their unique sockets.


These cheap $15 Toyota plastic clip kits from ebay make the job a snap because many of the old clips just break when you try to remove them. Easier to just replace --


The front kickpanels were cleaned and reinstalled with new clips as well.


The seatbelt module came next. It was bolted in place and the belt reattached to the "B" pillar.


Finally the "B" pillar cover and the plastic trim and weather stripping were reinstalled -


Lastly I tackled the airbag. When I removed the old airbag, the electrical lead plugs were damaged. The plugs have a locking tab on them that must be pushed up with a screwdriver or pick in order to release the plug. Easier said than done, because in my case the locking taps were glued in place. The glue was transferred from a wiring bundle retainer which was sitting right underneath the plugs and over time had leached/melted into the locking tabs. Breaking these things is apparently a common problem since the plugs are sold in bulk all over the Internet. I purchased a new plug set for $2.50 on ebay.


All soldered up and ready for the airbag


Unfortunately I ordered the wrong airbag -- my fault. The airbag I ordered/received is for a Highlander with left/right steering wheel mounted control pods. Mine doesn't have those. So I will have to wait a few days and exchange it for the proper airbag. The plugs are the same, but my current airbag is too small for my steering wheel center due to the lack of those control pods.